Use this guide to set up POS with your BookingCenter MyPMS and take advantage of the Point of Sale hardware features built-into the product. For recommended hardware, see Point of Sale (POS) Hardware and Gateway Forms
If you are using the Desktop PMS, see setup instructions for Windows or Macintosh OSX
- Connect Receipt Printers
- Connect EMV device(s)
- Connect Credit Card Swiper
- Testing the Card Swiper for Accuracy
- Connecting a Cash Drawer to a POS Printer
- Access and manage a Gateway account
- Issuing Refunds, Authorizations, and Settling credit card transactions through MyPMS
1. Connect a Receipt Printer

When using MyPMS, you can choose to use any standard LaserWriter, BubbleJet, or other printer because it’s the OS (Mac or Windows operating system) printer driver that defines support for the printer. The use of a Letter, a Report, or the Folio can be printed on any printer that your computer can support. Just make sure a printer driver is available prior to purchasing. Make sure the printer you want can support the size and style of Letters you wish to customize. For example, if a property wishes to have a small-format POS receipt print out, then one needs to create a Letter in MyPMS that is formatted to the printer chosen. Just about any formatting is possible witin MyPMS, you will just have to work on it with your print driver and the Letter till you ‘get it right’. Because BookingCenter cannot ‘see’ your print out, you will have to format the Letter for your print driver.
BookingCenter often recommends Epson POS products, and usually ships these to our POS customers. Although other printers follow pretty much the same guidelines, the Epson printers generally can’t be beat for price/performance and they come with the necessary cables – power and serial – to connect the POS printer to a standard Mac or PC.
2. Connect an EMV Device
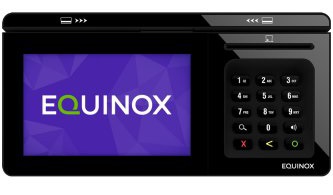
BookingCenter supports EMV devices by Equinox and PAX, and these devices will be shipped to your location with the certified “BookingCenter EMV App” pre-installed. You will be contacted by a representative of your merchant account to verify the devices works, get setup on your network, and upon completion of a test transaction, BookingCenter staff will be notified and we will connect the device(s) into MyPMS. Staff should watch our MyCard videos for understanding how EMV works seamlessly within MyPMS, from Kiosk operations to front desk use.
3. Connect the Credit Card Swiper
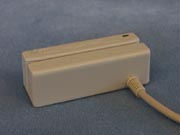
Simply unpack the credit card swiper (USB version shown below) and plug it into the free USB or PS/2 keyboard port of your computer, and then the keyboard into the free end (if using the PS/2 version).
4. Testing the card swiper for accuracy
The card swipe needs to read both track 1 and track 2. To test the results of the card swiper, open ‘notepad’ (on Windows) or Text Editor (on Mac) and swipe a card. You should get about 75 characters of garble starting with a %. The results should come out similar to this:%B5102101105105100^MCCULLOCH/JOSHUAJ ^03041010000001501000000947?;5102105101104100=05041010275005470300?
The % to ? is the 1st track, and the ; to ? is the 2nd track. MyPMS will parse and display Track 1 data (required). The actual data MyPMS send to the authorization networks is track 2. Please make sure that there swipe is displaying both tracks. If not, they should contact the manufacturer to see if it is capable, and if so, how to enable it. There is a series of keystrokes to enable it.
5. Connecting a Cash Drawer to a POS Printer
Only POS printers can be used to do this, as the printer must support sending a 12 volt pulse to open the cash drawer. There are usually two areas of concern when considering which Receipt Printer to get to work with a cash drawer:
Make sure the printer you want supports the OS (Mac or Win) you have with a ‘print driver’.
Make sure the printer you want can support the size and style of Letters you wish to customize for. For example, if a property wishes to have a small-format POS receipt print out, then one needs to create a Letter in MyPMS that is formatted to the printer chosen. Just about any formatting is possible within MyPMS, you will just have to work on it with your print driver and the Letter till you ‘get it right’. Because BookingCenter cannot ‘see’ your print out, you will have to format the Letter for your print driver.
6. Access and manage your Online Gateway Account
MyPMS accounts are usually setup with a traditional MyCard (for ‘card not present’ accounts or non-USA/Canadian merchant accounts) or an EMV MyCard account which offers both ‘card present’ and ‘card not present’ in a single Merchant ID and depends on the transaction, such as an online booking deposit, Self Check-in payment, Self-Cancellation payment, or ‘tap/dip’ at the front desk.
Desktop Users get setup with ‘Card Not Present’ accounts such as AuthorizeNet (Click here for info) or MyCard. Each user BookingCenter to use “Online Authorizations” has established an AuthNet Gateway account that connects the BookingCenter Software and online booking engine into your Merchant Account. At the time of registration of your BookingCenter POS Module, BookingCenter will deliver a user ID and password that will allow you to login to your Gateway account, though few customs ever use it, since the transactions are all embedded into PMS reporting.
7. Issuing Refunds, Authorization, and Charges through BookingCenter MyPMS
Refunds are simple and embedded by issuing a “-” negative onto a Folio to apply a credit to a card holder. Authorizations – viewing Auth Number, Auth amounts, Auth status, increment auth, and void auth – are built-in and managed easily within MyCard.
Details of the MyCard system used in MyPMS can be read here.
Below are instructions for Desktop users.
Refunds
Refunds are provided to a credit card holder simply by applying a negative (-) payment to their folio. This automates the refund to the credit card chosen. Thus, anyone who can issue a payment can issue a refund. More details on refunds are available in ‘Help’ area of MyPMS.
Authorizations
Authorizations can be taken manually, voided, or incremented (increased or decreased). Often they are taken at check in for the projected revenue (the total of all room + taxes) plus a ‘special fee’ that covers incidentals that is setup unique to each property. Thus, an authorization for a hotel that had an ‘incidental/special’ charge of $25 stay for a 2 night stay at $100/night and 10% tax would be received at check-in as follows: 2 x $100 ($200) + tax ($20) + the incidental charge ($25) for a total authorization of $245. More details on managing authorizations are available in ‘Help’ area of MyPMS.
Paying & Settlement
Paying (or charging a card) of a credit card occurs either when an online booking is made and your property has been set to ‘Apply Online Deposits’, when an operator manually does so to a specific credit card on a folio. The actual settlement of all credit card charges occurs at Night Audit when the button ‘settle credit cards’ is pressed (or, if you are using ‘Auto Night Audit’ automatically each night). Settlement can occur at any time – it is not necessary to wait till Night Audit to settle credit card payments, simply press the button to do it.