- Connect the Receipt printer
- Connect your Credit Card Swiper
- Prepare your BookingCenter Register
- Prepare Your BookingCenter Register Printer
- Enable Register Printers in BookingCenter
- Access and manage your Gateway account
- Issuing Refunds, Auth Only captures, and ChargeBacks from BookingCenter
1. Connect the Receipt Printer
BookingCenter recommends Epson POS products, and usually ships these to our POS customers. For Mac OSX, we use only network printers that connect via Ethernet. Although other printers may follow similar guidelines, the Epson TM class are what we support and these printers can’t be beat for price/performance.
The Epson’s POS products come with an Ethernet interface that needs to be addressed as an IP address on the network . The Epson comes with the necessary cables – power and ethernet – to connect the POS printer to an Ethernet network.
First, plug the A/C Adapter into the Epson Printer and the wall. Prepare the Epson with the cartridge and paper as specified in the manuals that come with the printer. Follow the instructions to set the IP address of the printer to anaddress that can be found on your network. Your Network Administrator will be necessary, or use the manual from Epson to accomplish this. • Note, BookingCenter support staff can NOT assign IP addresses for your printer(s).
POS Printer reusable: A case of printer paper will cost ~$120 and an extra box of 12 ribbons is ~$100. One roll of paper and ribbon is usually included with each purchase. Contact your local office supplier or ConsumerChoicePOS.Com or phone +1 (877) 699-5779 to order reusable Printer supplies.
2. Connect the USB Credit Card Swiper
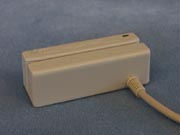
Simply unpack the USB credit card swiper (a shown below) and plug it into the free USB port of your computer or into the USB hub you are using.
When used on a Macintosh, the USB swiper must be programmed on a Windows machine to only use the Track 1 of data from credit card swipes. If BookingCenter did not perform this work for you prior to your purchase, then please contact support@BookingCenter.com to program the IDT Credit Card swiper to work on your Mac.
3. Prepare your BookingCenter Register
You must have purchased the BookingCenter Point of Sale Module for EACH computer to use a Point of Sale station. Each BookingCenter station has a unique ID ‘per terminal’ to assure proper transaction reporting. Choose the BookingCenter Parameters | Inventory | Registers to view the screen as below: Make each Register a unique ID (such a “Register 1”, “Bar” , “Front Desk”, etc…) by choosing “NEW” or “EDIT”.
Once done, click the “Set” button to set the Register once and for all. By doing this, each time BookingCenter launches on this computer, the computer will ‘know’ it’s Register ID.
Description: This is the Description used by the reports when doing Sales and Registers reports.
State Tax Exempt: This setting will make all transactions issued from this Register State Tax Exempt.
Local Tax Exempt: This setting will make all transactions issued from this Register Local Tax Exempt.
Default Guest: If you do a lot of Cash sales (off-the-street type of sales) then create a new BookingCenter Guest called ‘Cash Sales” and enter the Guest ID in this filed to make default sales from this register a Cash Sale account. If you normally add Sales items from this register to active accounts for Guests staying ‘in-house’ then do not worry about this setting.
Use Magnetic Card Reader: If this computer will have a credit acrd reader attached to it, then choose this setting. If you will entering credit card data automatically (by typing credit card names and numbers into BookingCenter Receipts) then do not check this box. Note, you can still type credit card data into a Receipt even if you are using a credit card reader.
Use Online Authorization: If this computer will be connected to the Internet to authorize credit card transactions, then choose this setting.
Note: ALL Receipt Types that have been chosen as “Credit Cards” and “Internet Enabled” (as shown below from Parameter | Booking System | Receipt Types) will try to process via the Internet if this option is checked. Only use this if you have setup an Authorize.Net or IBM Payment Gateway Account with BookingCenter.
4. Prepare Your BookingCenter Register Printer
When viewing your BookingCenter POS Register (as above), choose the Printer button to open the Register Printers.
Click “EDIT”.
- If using the Epson POS Printer supplied by BookingCenter, choose the “Buffered 40 Column” printer – the standard for POS roll printers. The ‘unbuffered’ will NOT work with all Macs to print the correct Booking Receipts, but will work with some.
- Choose Print Receipts ALWAYS if using the BookingCenter POS solution.
- Choose the Cutter option of the POS printer supports automatic cutting of the receipt after printing.
- If you are using a Cash Drawer, choose this option. The Cash Drawer will plug into the back of the POS Printer and the Printer will issue the 12Volt prompt to open the cash drawer after each transaction.
- Choose the Keyspan adapter if you are using this type, or the iDoc if using this – for Macintosh customers ONLY!!
- Choose the “Docket Printer Port” that matches the USB port you chose when setting up the POS Printer. Note – this MUST be the correct USB port in order to work correct and is the one that the Keyspan or iDoc (or USB hub ) is plugged into on your Macintosh.
To establish the POS register, you can ignore the features for Labels, as these are intended for printing special labels such as bar Codes and Wrist Printers from BookingCenter. if you desire to use these features, please contact support@BookingCenter.com and we can inform you of the supported Bar Code scanners and readers.
5. Enable Register Printer
Go to the Parameters | System Configurations and check the button that says ‘Use Registers”. If this button is NOT checked, your POS register Printer will NOT work. That’s it! You are now ready to use BookingCenter as a complete Point of Sale system.
6. Access and manage your Online Gateway Account
Each user of BookingCenter to use “Online Authorizations” has established an AuthNet Gateway account that connects the BookingCenter Software and <optional> online booking engine into your Merchant Account.
Access Your Gateway Account:
At the time of registration of your BookingCenter POS Module, BookingCenter will deliver a user ID and password that will allow you to login to your Gateway account at: https://account.authorize.net/ and begin to manage your transactions.
Learn AuthNet: A good overview of the features of AuthNet. Click here
Demo AuthNet: An online ‘walk through’ using AuthNet. Click here
7. Issuing Refunds, ChargeBacks, and Auth Only captures through BookingCenter
Refunds and ChargeBacks
Depending upon your use of the BookingCenter system., you will sometimes want to offer Refunds to customers. (See “Setting up Receipt Types” in the BookingCenter Reference Manual for more information on the Refund Receipt Type). BookingCenter will NOT automatically assign a Refund through to your Merchant Account, as most of our customers DO NOT want this. By issuing a Refund through BookingCenter, you can create a Refund receipt for the customer and choose to give them cash or check. If a refund issued to a Credit Card was intended, the manager will need to login into their Gateway account to actually issue a Charge Back or a Credit (which ever is appropriate). This is the only way to actually move money from your Merchant Account to the customer’s credit card.
Auth Only Transactions
BookingCenter does not currently support Auth Only transactions. Typically, this is used by hotels to authorize a credit card for an amount, but NOT settle the amount. BookingCenter is considering implementing this in a future release. At the current time, a manager must login to their Gateway to issue Auth Only transactions.